Short answer
Hexagon tile comes two ways: small hex mosaics on sheets, the classic choice for bathroom and shower floors, and large single hexagons for a bolder, modern floor. Mosaics live or die on hiding the sheet seams; large hexes on a flat floor and tight edges. Either way, the layout starts from control lines, the orientation is chosen so the cleanest cuts face the doorway, and the edges at walls and other floors are planned before any mortar is mixed.
Hexagon tile is a classic bathroom floor, and it is still one of the most requested shapes. Small white hexes suit a vintage bathroom, large cement-look or marble-look hexes suit a modern kitchen or entry, and both can make a plain room feel designed. Hexagons are also less forgiving than squares. There is no straight joint anywhere in the pattern, every edge needs cut pieces, and small errors show as a crooked honeycomb. This guide covers how hexagon floor tile is chosen, laid out and finished, including the transitions that trip up many installs.
Small hex mosaics vs large hexagon tile
Hex mosaics are small pieces, often around 1" to 3" across, mounted on sheets roughly a foot square. The sheet goes down as one piece, so a floor goes in faster than it would piece by piece. Many grout joints give grip underfoot, and small pieces follow the slope of a shower floor. The drawback is the sheet itself: if the gaps between sheets don't match the gaps within them, the floor shows a grid of squares.
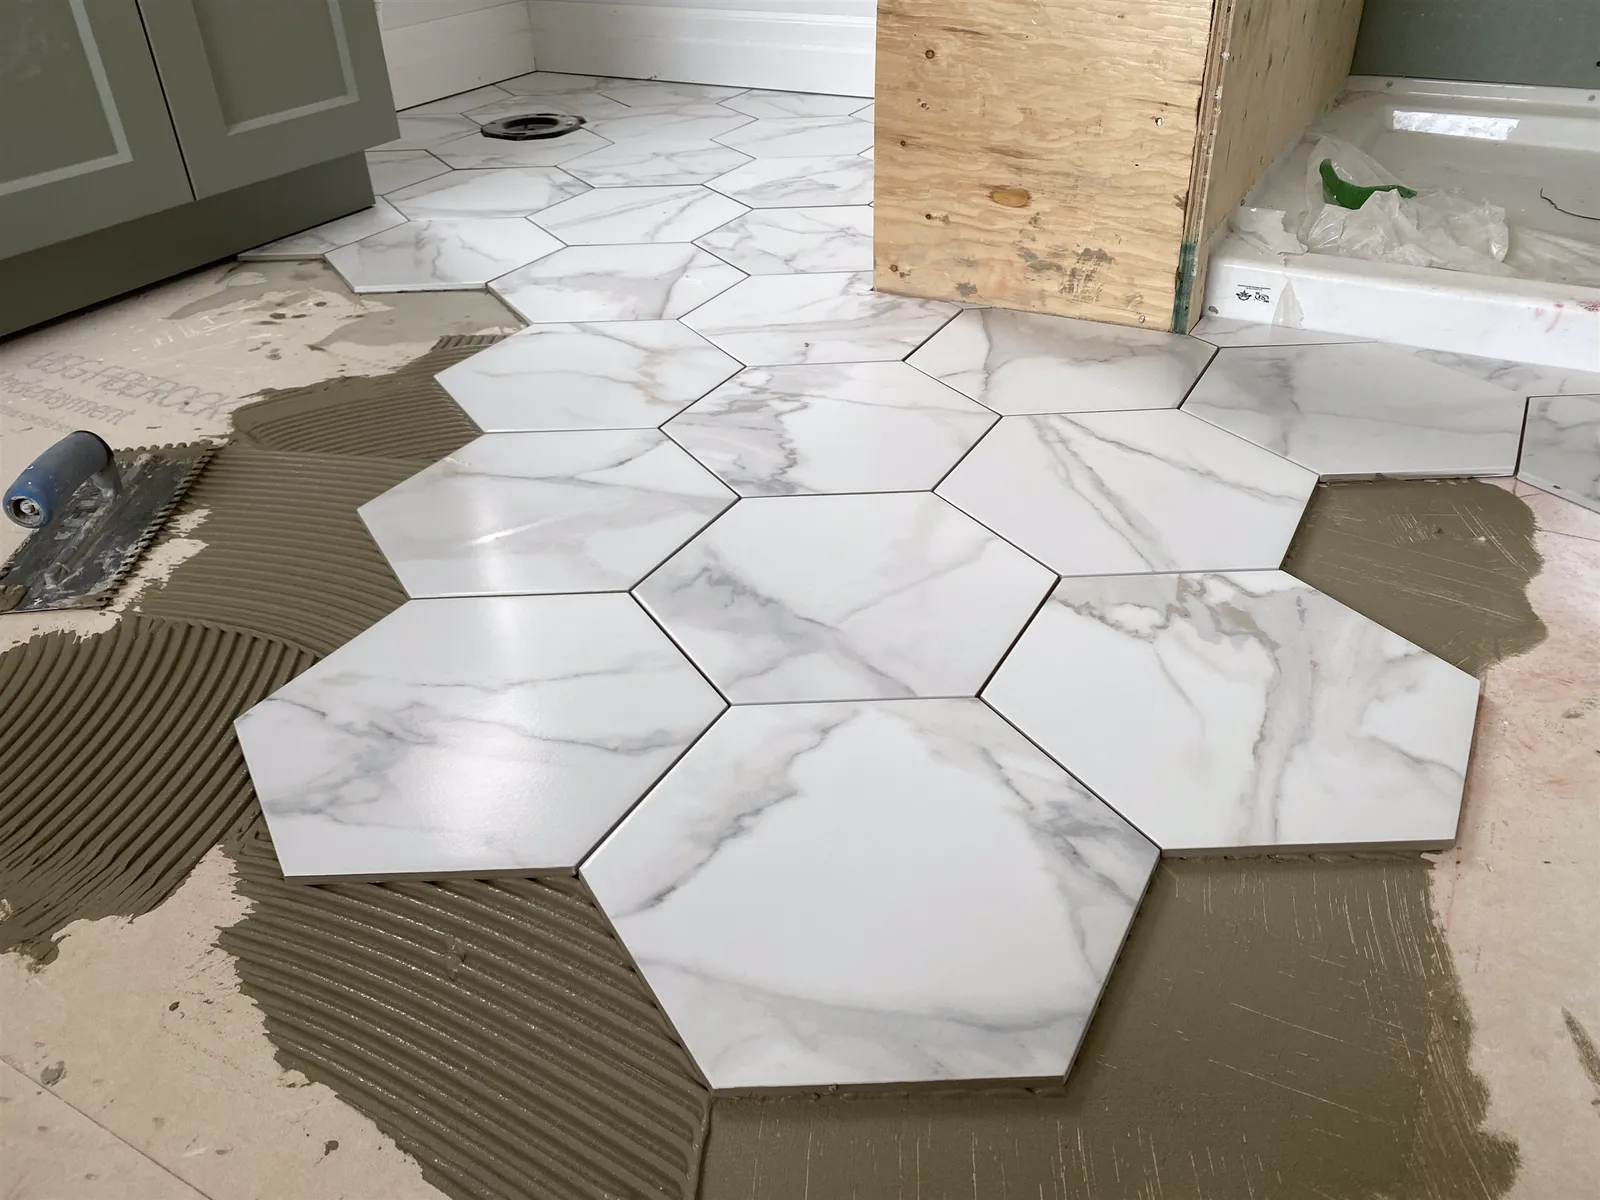
Large hexagon tile is set one piece at a time. Sizes run from about 6" or 8" across to well over a foot. Large hexes give a strong graphic floor with fewer joints, and they suit entries, kitchens, bathrooms and commercial spaces. They are harder to keep flat, they need more cutting at the edges, and they don't bend to a shower slope.
One thing to check when comparing products is how the size is measured. Some makers give the distance across the flats, and others the distance from point to point, which is larger. Two "8-inch" hexagons can be noticeably different sizes, so look at the spec sheet or a sample.
Where hexagon tile works best
The hex tile bathroom floor is the classic use. Small hexes in white, black or marble suit both older homes and new builds, and they pair well with subway tile walls. Our guide to bathroom floor tile ideas shows how hexagons compare with other floor choices.
Large hexagons work well in entries, mudrooms and kitchens, where the shape adds interest to a simple room. A porcelain hex handles salt, slush and wet boots in an Ottawa entry as well as any other porcelain tile. On walls, hex mosaics and mid-size hexes are popular for backsplashes and shower walls. Encaustic-look and cement hexes bring pattern as well as shape; see cement tile.
Hexagon tile layout: orientation and control lines
A hexagon can sit with a flat side facing you or with a point facing you. Which way it is turned changes how the floor looks and where the cuts land, so it is decided first.
The geometry matters here. Picture the hexes lined up in straight columns, each one sitting flat on the one below. Along a wall parallel to those columns, the cut line can run through the middle of one column, so every piece along that wall is the same neat half-hexagon. Along the walls at right angles, the cut line crosses columns that are offset from each other, so the cut pieces alternate in size and shape. A good layout puts the neat, even edge where it is seen most: the doorway, the front of a vanity or tub, or the longest open wall. The alternating edge goes under a vanity or along a less visible wall.
Because there are no straight joints, control lines are snapped through the tile pattern rather than along a joint. A common method is to snap a main line along the flat edges or the centres of one row of hexes. Parallel lines then go at the measured row repeat, every few rows. A second line at right angles keeps the pattern from drifting. Before setting, dry-lay a strip in each direction from the centre of the room to check the cuts at both walls. If one wall ends with a sliver, shift the whole layout. Our guide to tile patterns and layouts covers balancing cuts in general.
Matching grout lines between sheets
With hex mosaics, the sheet seams are the giveaway. Hex sheets have stepped, interlocking edges, so each sheet nests into the next. The joints where they meet must be exactly as wide as the joints inside each sheet. If a sheet sits a little too far away or too close, the line of joints along its edge shows as a zigzag seam. Repeat that across a floor and you see the outline of every sheet, especially with a contrasting grout.
The fixes are the same as for any mosaic, with more care because hexes interlock. Snap control lines every few sheets so errors can't add up. Set a few sheets, then step back and look from standing height and from an angle while the mortar is still soft. Slide whole sheets into line before nudging single pieces. Never stretch a sheet to fill a gap, because the mesh lets the joints open. Cut the sheet into strips or single pieces instead. Mix sheets from several boxes too, so any shade difference spreads out. Our guide to mosaic tile installation covers the mortar, trowel and beating-in steps for sheets.
Large hexagon tile: lippage and flatness
Large hexagons behave like other big tile. A tile that spans a dip in the floor leaves a hollow underneath and an edge that sits higher than its neighbour. Hexagons make this more visible, because every tile meets six others, and the points where three tiles meet show any height difference clearly. A slight warp in the tiles adds to it.
Preparation is what prevents it. The floor is checked with a long straightedge and corrected first, with patching, grinding or a self-levelling underlayment. Each hex is back-buttered and set into a combed bed of mortar with a notch that suits its size; what size trowel for tile gives starting points. Levelling clips can be used on large hexes, with a clip near the middle of the longer joints, to hold neighbouring edges flush while the mortar cures. They help, but they don't flatten a wavy floor. Our guide to tile lippage and levelling systems explains the limits. Industry standards allow only a small amount of lippage, and side light from a patio door or window will show anything more.
Finishing edges at walls
A hexagon can't meet a straight wall without a cut. On floors, the cut edge along each wall sits under the baseboard or a tile base, with the usual movement gap at the perimeter. The cuts still need to be neat and consistent, because a tile base or a light baseboard doesn't hide much. Many hex lines sell half-hexagon or edge pieces with one straight side. These give a clean factory edge along the main wall and save a lot of cutting. Check if your tile line has them before ordering.
On walls, there are two approaches. The first is a straight edge: the hexes are cut in a straight line and finished with a metal profile or a border tile, as in our tile edge trim guide. The second is a free-form edge, where the honeycomb is left to break off in its natural stepped shape against a painted wall. It looks striking on a backsplash, but every exposed tile edge shows its side. It suits tile with a finished or through-body edge, and the painter has to cut in around each piece.
Around toilet flanges, floor drains and door casings, hexes are cut individually. Cutting porcelain hexes cleanly takes a wet saw or a good grinder; small mosaic pieces are trimmed with nippers. Cut porcelain wet, with a respirator, eye and hearing protection, because the dust contains silica. See how to cut porcelain tile.
Hexagon tile transitions at doorways
A hexagon tile transition to another floor is usually a straight line, often under the door. The hexes are cut along that line, and the edge gets a metal profile, a reducer or a stone threshold, depending on the height difference. A marble threshold suits a hex bathroom floor, and it hides the cut edge completely; see marble thresholds. Plan floor heights early, because tile, mortar and any membrane rarely finish at the same height as the floor next to them. Our guide to floor transition strips covers the pieces for each pair of floors.
Organic hex-to-wood transitions: honest about the labour
A popular design detail is letting hexagons flow into a wood floor without a straight line, with the honeycomb edge breaking into the planks. It can look beautiful. It is also one of the most labour-intensive transitions in flooring, and it needs planning from both trades.
Usually the tile goes in first, with full hexes along the edge so the stepped outline is clean. Then each wood plank that meets the tile is scribed, cut by hand to follow the points and flats of the hexes. A short transition can mean dozens of individual cuts, each one fitted, adjusted and fitted again. The two floors also have to finish at the same height, so the build-up under the thinner floor is planned in advance.
The wood still moves. Hardwood shrinks in dry Ottawa winters and swells in humid summers, and floating floors expand and contract as one piece. The scribed edge keeps a small gap, filled with a colour-matched flexible filler, never grout or rigid filler. With floating floors, check whether the maker's instructions allow this kind of edge at all. Expect the transition to cost far more than a strip, and to be quoted separately.
Small hex tile on shower floors
Small hexes are one of the best shower floor tiles. A centre drain slopes the floor toward it from all sides, and small pieces can follow that funnel shape where large tile can't. The many grout joints add grip on a wet floor. A matte or textured hex is safer than a glossy one. Our guide to choosing shower tile covers slip resistance.
The mosaic doesn't make the floor waterproof. It goes over a sloped, waterproofed base, and the mosaic and its backing must be rated for shower floors. The cuts around the drain grate are the detail everyone sees, so they are fitted piece by piece, with each small piece fully bedded. Grout choice matters too, because a hex mosaic floor is mostly joints. Epoxy and high-performance grouts resist staining and are common on mosaic shower floors; see epoxy vs cement grout.
Colour patterns with hexagons
Hexagons lend themselves to pattern. A flower or rosette places one hex of one colour surrounded by six of another, repeated across the floor. A random scatter sprinkles a second colour through the field. A gradient or fade starts dense with one colour at one end of the room and thins out across it. A border band of a darker hex frames the room a short distance from the walls. A large hex can also run in a single colour, letting the shape do the work.
Many mosaics come with patterns already on the sheet, which is the quickest option. A custom pattern means pulling pieces out of sheets and setting new ones in, which adds labour. Dry-lay any pattern before setting it, look for clumps in a random scatter, and plan where the pattern meets the walls and doorway so a motif isn't cut in half where it shows. Contrasting grout makes the honeycomb pop but shows every uneven joint, while matching grout lets the colours carry the design.
Cost, extra tile and DIY
Hexagon floors usually need about 10% to 15% extra tile, depending on the room and the tile size. Labour is higher than for squares, mainly because of the cuts at every wall and transition and, with mosaics, the care needed to hide the sheets. Large hexes in a big room add floor preparation. For what drives the price, see tile installation cost in Ottawa.
A small hex backsplash or a powder room floor with good sheets is a reasonable DIY job for someone patient. A hex shower floor, a large-hex kitchen with long sightlines, or an organic transition into wood is better left to an experienced installer. Agora installs hexagon tile from small mosaics to large hexes; you can see examples in our project gallery.
Frequently asked questions
How do you lay out hexagon tile?
Choose the orientation first, then snap control lines through the centres or flat edges of one row and at the row repeat. Dry-lay from the centre to both walls and shift the layout so the neat, even cuts face the doorway.
How do you hide seams in hexagon mosaic sheets?
Make the joints between sheets exactly as wide as the joints inside them. Snap lines every few sheets, check from standing height while the mortar is soft, and cut sheets rather than stretching them.
How do you finish hexagon tile at a wall?
On floors, the cut edge sits under the baseboard or tile base, and half-hex edge pieces give a cleaner line where available. On walls, cut a straight edge and finish it with trim, or leave a free-form honeycomb edge if the tile edge looks finished.
What transition do you use from hexagon tile to wood?
Most often a straight cut under the door with a metal profile, reducer or threshold. An organic, scribed transition is possible, but it takes far more labour and needs a flexible joint for the wood's movement.
Is hexagon tile good for a shower floor?
Small hex mosaics are one of the best choices, because they follow the slope to a centre drain and the many joints add grip. Large hexes don't suit a sloped shower floor.
How much extra hexagon tile should I order?
Typically about 10% to 15%, more in small rooms with many corners. Keep a few spare pieces or sheets for future repairs.