Short answer
A shower niche is a recessed shelf built into the wall between the studs. With studs at 16" on centre, the framed opening is about 14 1/2" wide and as deep as the stud. Finished niches end up a little narrower and usually about 3" to 3 1/2" deep. Put it on an interior wall, out of the direct spray and within easy reach, and treat it as part of the shower's waterproofing: every inside corner sealed and the sill sloped slightly into the shower.
A shower niche is one of the most requested details in a bathroom renovation, and one of the easiest to get wrong. It is a small box, but it has more corners, cuts and waterproofing seams than any other part of the shower wall. This guide covers how big a shower niche can be, where to put it, how it is waterproofed and how to tile a shower niche so it looks built in, not added on.
What a shower niche is and why it beats a caddy
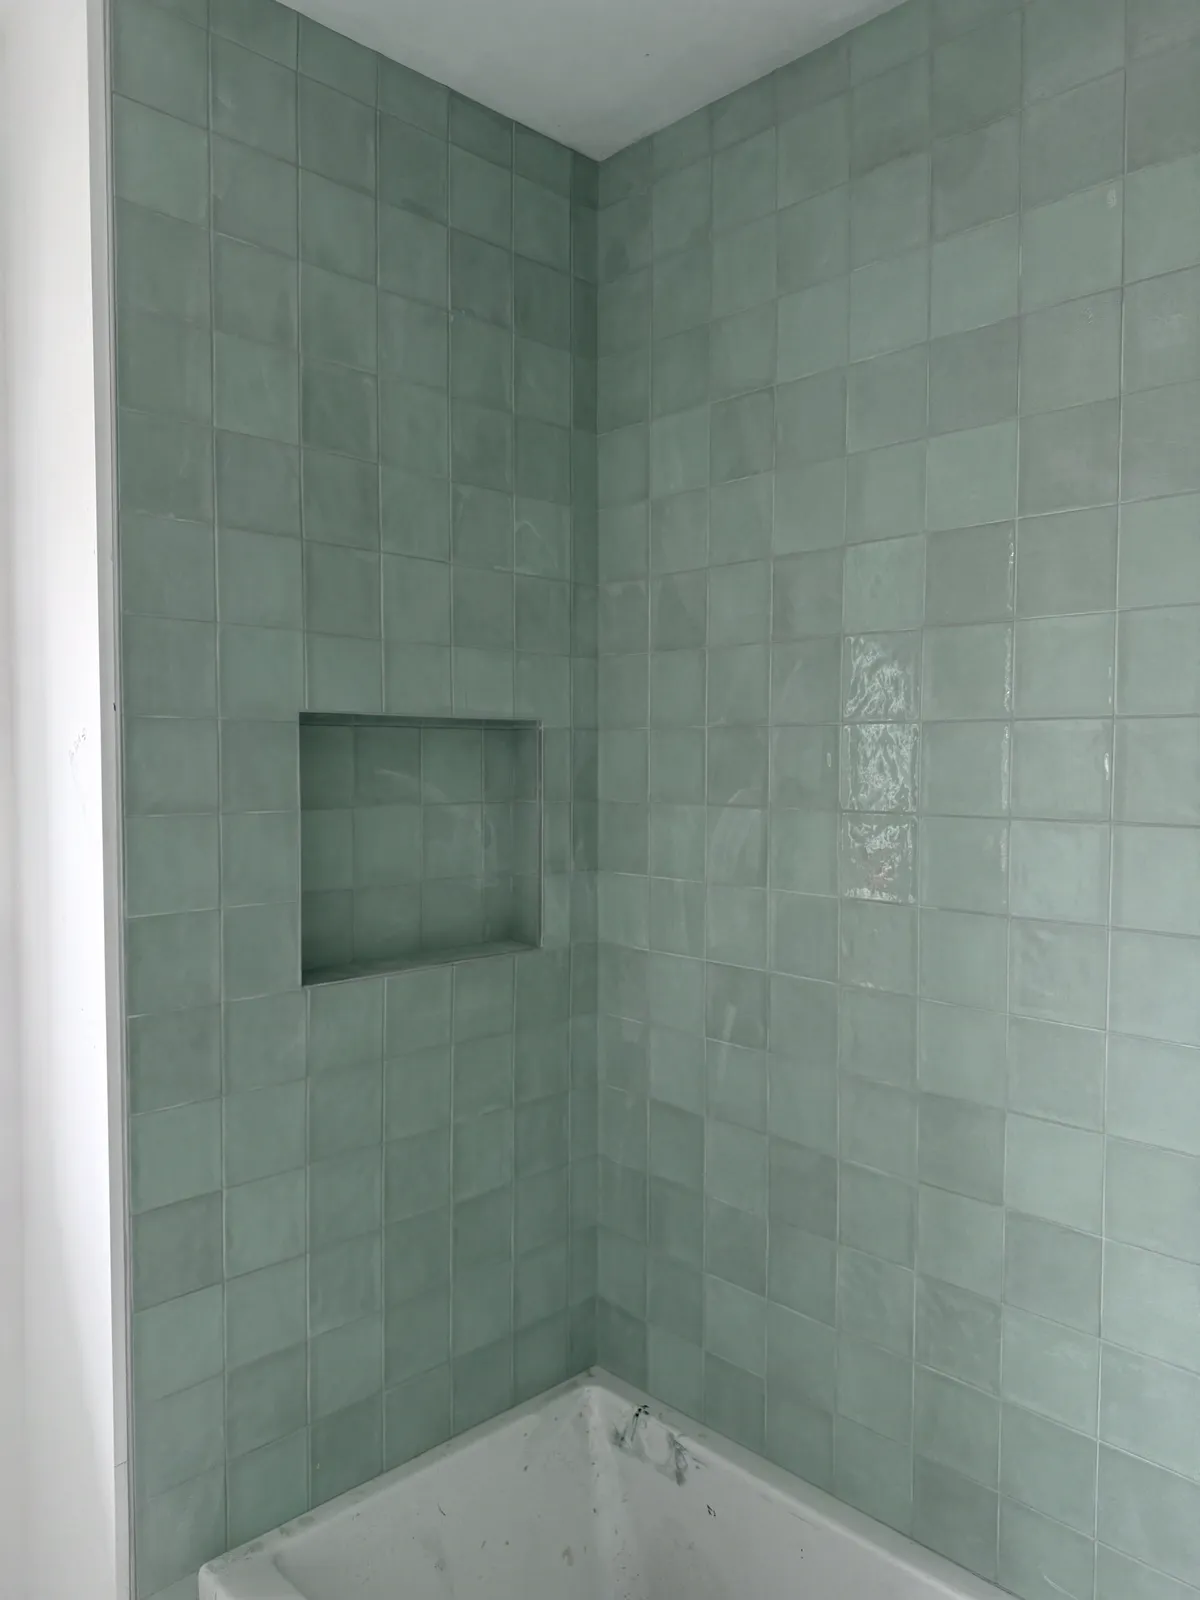
A niche is a recess framed into the wall, lined with a waterproof board or membrane, and tiled like the rest of the shower. It gives shampoo and soap a place to sit without anything sticking out from the wall.
The alternatives all have drawbacks. Hanging caddies rust, slide down the shower arm and collect grime. Suction and adhesive shelves fall off. Corner shelves set into the grout joints work, but they stick out into the shower, catch elbows and collect water on top. A recessed shower shelf keeps the space clear, is easy to clean, and can be tiled to match or contrast with the walls. Planned well, it is a design feature as much as storage.
Shower niche size: what fits between the studs
Most interior walls in Canadian houses are framed with 2×4 studs at 16" on centre. Each stud is 1 1/2" thick, which leaves about 14 1/2" of clear width between two studs. The finished niche ends up narrower than that, because the board and tile on each side take up space. Depending on the board and tile thickness, the finished opening is often around 12" to 13" wide.
Depth is limited by the stud. A 2×4 wall is 3 1/2" deep, and the back of the niche needs its own board and tile. Once everything is in, the usable depth from the face of the wall tile to the back is usually about 3" to 3 1/2". That is enough for most bottles, but it is worth measuring your largest pump bottle before the framing is built. A 2×6 wall gives more depth.
Height is easy to change. Within one stud bay, the niche can be as tall as you like; the carpenter or installer only adds horizontal blocking at the top and bottom. Width is harder. A niche wider than one stud bay means cutting a stud and framing a header above and a sill below to carry it. On a load-bearing wall, that is structural work for a carpenter or contractor, and the wall's load has to be considered properly.
There are also prefabricated niches. Foam board units such as Schluter's KERDI-BOARD-SN, and similar products from other waterproofing systems, come in set sizes, some made to fit between studs at standard spacing. They are light, square and waterproof once their joints to the wall are sealed with the system's own band or sealant. Check the maker's current sizes, because they vary by product line.
Sizing the niche to the tile
This is where good and average niches part ways. The best niches are sized to the tile, so the opening lands on grout lines, or is framed by clean, even cuts. If the opening is set first and the tile second, you often end up with a thin sliver above or beside the niche that draws the eye straight to it.
The way to avoid that is to plan the tile layout on the wall before the niche is framed. Mark the rows on the stud wall, or draw them on a plan, and place the top and bottom of the niche on joint lines. For a 12 × 24 tile set horizontally, for example, a niche one or two rows tall lines up neatly. With small tile or mosaics, it is easier, because small adjustments fall within one tile.
Also think about the niche's inside. The back panel, sides, top and sill all need pieces too. A niche that is a few millimetres too wide for full tiles at the back leaves awkward slivers in the corners. The installer and the person framing the niche should agree on the exact size before any board goes up.
Placement and shower niche height
Where the niche goes matters as much as how big it is. A few rules hold for most showers.
Use an interior wall. In Ottawa, avoid putting a niche in an exterior wall. Cutting into that wall means less insulation behind the niche, a break in the vapour barrier and a cold spot. Warm, moist shower air can then condense inside the wall in winter. If the only option is an exterior wall, the insulation and vapour barrier detail has to be planned carefully with the contractor, and many installers will suggest another spot.
Check what is in the wall. Plumbing supply lines, drain and vent stacks, electrical wiring and heating ducts often run through bathroom walls. The valve wall usually has pipes running up to the shower head. Open the wall or check from the other side before deciding.
Stay out of the direct spray if you can. A niche facing the shower head gets blasted with water every day. Bottles get knocked over and the sill rarely dries. A side wall, or the valve wall below the spray, usually works better.
Think about the view. Many people prefer a niche that isn't the first thing seen from the bathroom door, because it is full of bottles. A niche on the side wall is often less visible than one on the back wall.
Set the height for the people using it. The niche should be easy to reach without bending or stretching, usually somewhere between waist and shoulder height for the main users. Many people place it just above or beside the valve so everything is within one reach. In a shower with a hand shower or a seat, a lower niche, or a second one, helps.
Single, double, horizontal or vertical
A single niche suits most showers. A double niche, either two separate recesses or one tall recess divided by a shelf, gives room for more bottles or for two people. Tall vertical niches fit naturally within one stud bay, so they need no change to the framing, and a shelf inside splits them into two levels. Long horizontal niches look sleek, especially in a large shower, but they cross several studs and need a header and proper framing.
A shelf inside a niche is usually a solid piece of stone, quartz or porcelain, set into the side walls or resting on the tile. Glass shelves are another option, but they need solid support and careful waterproofing where they meet the walls.
In a tub surround, the same rules apply. The niche sits within the waterproofed area, low enough to reach from the tub while bathing and high enough to clear the tub deck. See our guides to a tub to shower conversion and a walk-in shower if you are reworking the whole space.
Waterproofing a shower niche
The niche is one of the most common leak points in a tiled shower. It has five inside faces, eight inside seams where they meet, four outside corners at the opening, and a sill that sits right where water collects. Grout and tile are not waterproof, so water that reaches the niche will find any gap behind the tile.
The niche has to be part of the same waterproofing system as the rest of the shower. With a sheet membrane such as Schluter-KERDI, the niche is lined with membrane or built from waterproof foam board. Every inside and outside corner is then sealed with the system's preformed corners and seam band. With a liquid membrane, the corners get the fabric or tape the system calls for, and the coats are built up to full thickness on every face. Our comparison of liquid vs sheet waterproofing explains both approaches.
The sill needs special attention. It must slope slightly toward the shower, so water runs out rather than sitting against the back wall. A flat or backward-sloping sill leaves standing water, which soaks the grout and finds any weak spot. The slope is built into the framing or board before waterproofing, not added later with extra mortar.
One more thing to know: a flood test fills the shower floor with water, so it doesn't test the niche. The niche relies on careful detailing and inspection before tiling. That is why the sequence in how to waterproof a shower treats the niche as its own step. Agora has waterproofed more than 350 showers with Schluter-KERDI, and in every system the same rule holds: the niche is sealed as carefully as the shower floor.
How to tile a shower niche
Tiling a niche takes longer than tiling the same area of flat wall, because nearly every piece is cut. The layout is planned with the wall, so the grout lines on the wall continue into the niche. The joints on the back panel line up with the joints on the wall around it, and the side pieces line up with the rows.
The order varies between installers, but a common sequence is this:
- Tile the wall up to and around the niche opening, with the cuts at the edges planned.
- Set the back panel of the niche, centred and lined up with the wall joints.
- Set the sill, sloped toward the shower, with its front edge finished.
- Set the sides, sitting on the sill so water runs off rather than into a joint.
- Set the top last, held in place with tape until the mortar grabs.
- Grout, then seal the inside corners with flexible sealant where the system calls for it.
The back panel is often where people add a feature tile, such as a mosaic, a contrasting colour or a strip of the floor tile. It is a good place for it: small, easy to see and easy to clean. Check the feature tile's thickness, though. A thinner or thicker tile than the walls changes the depth and the edge details. Our guide to mosaic tile installation covers setting small tile.
Finishing the edges: trim or mitres
The front edges of the niche show the side of the tile, so they need a finish. There are three common options.
Metal edge trim is set into the mortar along each edge, with the tile butting against it. Profiles such as Schluter JOLLY (square), RONDEC (rounded) and QUADEC (square with a finished corner piece) come in brushed and polished finishes and many colours. Trim is durable, protects the tile edges from chips and gives a crisp line. Our tile edge trim guide compares the profiles.
Mitred corners are cut at 45 degrees on each piece, so the two faces meet in a clean corner with no metal showing. They look seamless, especially with porcelain that has colour through the body. They take time, a good saw and a careful hand. On glazed ceramic, the cut edge shows the clay body, and thin mitred edges can chip, so a small bevel is often left rather than a knife edge.
Bullnose or finished-edge tile, where the tile range offers it, gives a rounded edge without trim.
For the sill, a single solid piece of stone, quartz or porcelain avoids grout joints where water sits. It is cut to the full width and depth, sloped toward the shower, and its exposed front edge is polished or eased. This is often the same material as a marble threshold or curb cap, which ties the shower together.
Lighting in a niche
LED strips in a niche are popular. They are also electrical work in a wet location, so they are designed and installed by a licensed electrician, with an ESA permit where required, using only products rated for wet locations. The wiring has to pass through the waterproofing, so the penetration must be sealed with the system's method. Plan lighting before the walls are closed: the electrician runs the wire, the waterproofing is detailed around it, and the light is fitted after tiling.
How a niche affects labour and cost
A niche adds more to a shower than its size suggests. Framing or a prefabricated unit, extra waterproofing corners and seams, many small cuts, edge trim or mitres, and a stone sill or shelf all add time and material. A niche with mitred edges and a mosaic back panel takes noticeably more labour than one with simple trim. A second niche, a long horizontal niche across studs, or lighting adds more.
For the main factors in a shower budget and typical ranges, see how much it costs to tile a shower in Ottawa. For the full order of work, see how to tile a shower.
Shower niche mistakes to avoid
- A niche on an exterior wall, with the cold spot and condensation risk that come with it.
- A flat or back-sloping sill that holds water.
- Unsealed inside corners, the most common niche leak.
- Grout lines that don't line up with the wall, or slivers of tile around the opening.
- A niche too shallow or short for the bottles you use.
- Placing it in the direct spray or out of easy reach.
- Cutting into a wall without checking for pipes, wires, vents or ducts.
- A back panel so thin that screws or fixtures from the room behind poke through.
Most of these are decided before the first tile goes on, during framing and waterproofing. That is the time to agree on the size, height and finish with your installer. Our shower tile guide covers the tile choices that go with it.
Frequently asked questions
What is a standard shower niche size?
There isn't one standard, but most niches fit within one stud bay. With studs at 16" on centre that gives about 14 1/2" of framed width, so finished niches are often around 12" to 13" wide and about 3" to 3 1/2" deep. Height is chosen to suit the tile layout and the bottles.
How high should a shower niche be?
Within easy reach of the main users, usually between waist and shoulder height, and often near the valve. In a tub, it goes lower so it can be reached while sitting.
Can a shower niche go on an exterior wall?
It is best avoided, especially in a cold climate like Ottawa's. The niche reduces the insulation and interrupts the vapour barrier, which can lead to condensation inside the wall.
Should a shower niche slope?
Yes. The sill should slope slightly toward the shower so water drains out instead of sitting against the back wall.
Is a prefabricated niche better than a framed one?
Prefabricated foam niches are square, light and waterproof, with fewer seams to seal, but they come in set sizes. A framed niche can be any size, including one sized exactly to the tile. Both work when waterproofed with the same system as the shower.
Do shower niches leak?
A properly waterproofed niche doesn't. Leaks come from unsealed corners, a flat sill or a gap where the niche meets the wall membrane, so those details matter most.